搜索
登录
OpenClaw在Fly.io上部署方法
更新时间:2026-03-09 10:37:47
目标:OpenClaw Gateway 网关运行在Fly.io机器上,具有持久存储、自动 HTTPS 和 Discord/渠道访问。
你需要什么
- 已安装flyctl CLI
- Fly.io 账户(免费套餐可用)
- 模型认证:Anthropic API 密钥(或其他提供商密钥)
- 渠道凭证:Discord bot token、Telegram token 等
初学者快速路径
- 克隆仓库 → 自定义
fly.toml - 创建应用 + 卷 → 设置密钥
- 使用
fly deploy部署 - SSH 进入创建配置或使用 Control UI
1)创建 Fly 应用
Clone the repo git clone https://github.com/openclaw/openclaw.git cd openclaw # Create a new Fly app (pick your own name) fly apps create my-openclaw # Create a persistent volume (1GB is usually enough) fly volumes create openclaw_data --size 1 --region iad
提示:选择离你近的区域。常见选项:lhr(伦敦)、iad(弗吉尼亚)、sjc(圣何塞)。
2)配置 fly.toml
编辑fly.toml以匹配你的应用名称和需求。
安全注意事项:默认配置暴露公共 URL。对于没有公共 IP 的加固部署,参见私有部署或使用fly.private.toml。
app = "my-openclaw" # Your app name primaryregion = "iad" [build] dockerfile = "Dockerfile" [env] NODEENV = "production" OPENCLAWPREFERPNPM = "1" OPENCLAWSTATEDIR = "/data" NODEOPTIONS = "--max-old-space-size=1536" [processes] app = "node dist/index.js gateway --allow-unconfigured --port 3000 --bind lan" [httpservice] internalport = 3000 forcehttps = true autostopmachines = false autostartmachines = true minmachinesrunning = 1 processes = ["app"] vm size = "shared-cpu-2x" memory = "2048mb" [mounts] source = "openclaw_data" destination = "/data"
关键设置:

3)设置密钥
Required: Gateway token (for non-loopback binding) fly secrets set OPENCLAWGATEWAYTOKEN=$(openssl rand -hex 32) # Model provider API keys fly secrets set ANTHROPICAPIKEY=sk-ant-... # Optional: Other providers fly secrets set OPENAIAPIKEY=sk-... fly secrets set GOOGLEAPIKEY=... # Channel tokens fly secrets set DISCORDBOTTOKEN=MTQ...
注意事项:
- 非 loopback 绑定(
--bind lan)出于安全需要OPENCLAWGATEWAYTOKEN。 - 像对待密码一样对待这些 token。
- 优先使用环境变量而不是配置文件来存储所有 API 密钥和 token。这可以避免密钥出现在
openclaw.json中,防止意外暴露或记录。
4)部署
首次部署构建 Docker 镜像(约 2-3 分钟)。后续部署更快。 部署后验证:
你应该看到:
[gateway] listening on ws://0.0.0.0:3000 (PID xxx) [discord] logged in to discord as xxx
5)创建配置文件
SSH 进入机器创建正确的配置:
创建配置目录和文件:
mkdir -p /data cat /data/openclaw.json << 'EOF' { "agents": { "defaults": { "model": { "primary": "anthropic/claude-opus-4-5", "fallbacks": ["anthropic/claude-sonnet-4-5", "openai/gpt-4o"] }, "maxConcurrent": 4 }, "list": [ { "id": "main", "default": true } ] }, "auth": { "profiles": { "anthropic:default": { "mode": "token", "provider": "anthropic" }, "openai:default": { "mode": "token", "provider": "openai" } } }, "bindings": [ { "agentId": "main", "match": { "channel": "discord" } } ], "channels": { "discord": { "enabled": true, "groupPolicy": "allowlist", "guilds": { "YOURGUILDID": { "channels": { "general": { "allow": true } }, "requireMention": false } } } }, "gateway": { "mode": "local", "bind": "auto" }, "meta": { "lastTouchedVersion": "2026.1.29" } } EOF注意:使用OPENCLAWSTATEDIR=/data时,配置路径是/data/openclaw.json。
注意:Discord token 可以来自:
- 环境变量:
DISCORDBOTTOKEN(推荐用于密钥) - 配置文件:
channels.discord.token
如果使用环境变量,无需将 token 添加到配置中。Gateway 网关会自动读取DISCORDBOTTOKEN。 重启以应用:
exit fly machine restart <machine-id
6)访问 Gateway 网关
Control UI
在浏览器中打开:
或访问https://my-openclaw.fly.dev/粘贴你的 Gateway 网关 token(来自OPENCLAWGATEWAYTOKEN的那个)进行认证。
日志
fly logs # Live logs fly logs --no-tail # Recent logs
SSH 控制台
故障排除
”App is not listening on expected address”
Gateway 网关绑定到127.0.0.1而不是0.0.0.0。
修复:在fly.toml中的进程命令添加--bind lan。
健康检查失败 / 连接被拒绝
Fly 无法在配置的端口上访问 Gateway 网关。
修复:确保internal_port与 Gateway 网关端口匹配(设置--port 3000或OPENCLAWGATEWAYPORT=3000)。
OOM / 内存问题
容器持续重启或被终止。迹象:SIGABRT、v8::internal::Runtime_AllocateInYoungGeneration或静默重启。
修复:在fly.toml中增加内存:
或更新现有机器:
fly machine update <machine-id--vm-memory 2048 -y
注意:512MB 太小。1GB 可能可以工作但在负载或详细日志记录下可能 OOM。推荐 2GB。
Gateway 网关锁问题
Gateway 网关拒绝启动并显示”already running”错误。 这发生在容器重启但 PID 锁文件在卷上持久存在时。
修复:删除锁文件:
fly ssh console --command "rm -f /data/gateway.*.lock" fly machine restart <machine-id
锁文件在/data/gateway.*.lock(不在子目录中)。
配置未被读取
如果使用--allow-unconfigured,Gateway 网关会创建最小配置。你在/data/openclaw.json的自定义配置应该在重启时被读取。 验证配置是否存在:
fly ssh console --command "cat /data/openclaw.json"
通过 SSH 写入配置
fly ssh console -C命令不支持 shell 重定向。要写入配置文件:
Use echo + tee (pipe from local to remote) echo '{"your":"config"}' | fly ssh console -C "tee /data/openclaw.json" # Or use sftp fly sftp shell put /local/path/config.json /data/openclaw.json注意:如果文件已存在,fly sftp可能会失败。先删除:
fly ssh console --command "rm /data/openclaw.json"
状态未持久化
如果重启后丢失凭证或会话,状态目录正在写入容器文件系统。修复:确保fly.toml中设置了OPENCLAWSTATEDIR=/data并重新部署。
更新
Pull latest changes git pull # Redeploy fly deploy # Check health fly status fly logs
更新机器命令
如果你需要更改启动命令而无需完全重新部署:
Get machine ID fly machines list # Update command fly machine update <machine-id--command "node dist/index.js gateway --port 3000 --bind lan" -y # Or with memory increase fly machine update <machine-id--vm-memory 2048 --command "node dist/index.js gateway --port 3000 --bind lan" -y
注意:fly deploy后,机器命令可能会重置为fly.toml中的内容。如果你进行了手动更改,请在部署后重新应用它们。
私有部署(加固)
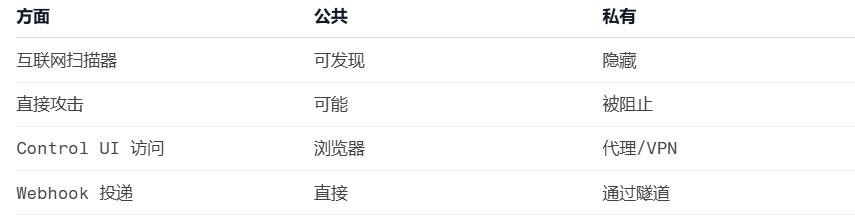
默认情况下,Fly 分配公共 IP,使你的 Gateway 网关可通过https://your-app.fly.dev访问。这很方便,但意味着你的部署可被互联网扫描器(Shodan、Censys 等)发现。 对于无公共暴露的加固部署,使用私有模板。
何时使用私有部署
- 你只进行出站调用/消息(无入站 webhooks)
- 你使用ngrok 或 Tailscale隧道处理任何 webhook 回调
- 你通过SSH、代理或 WireGuard而不是浏览器访问 Gateway 网关
- 你希望部署对互联网扫描器隐藏
设置
使用fly.private.toml替代标准配置:
Deploy with private config fly deploy -c fly.private.toml
或转换现有部署:
List current IPs fly ips list -a my-openclaw # Release public IPs fly ips release <public-ipv4-a my-openclaw fly ips release <public-ipv6-a my-openclaw # Switch to private config so future deploys don't re-allocate public IPs # (remove [http_service] or deploy with the private template) fly deploy -c fly.private.toml # Allocate private-only IPv6 fly ips allocate-v6 --private -a my-openclaw
此后,fly ips list应该只显示private类型的 IP:
VERSION IP TYPE REGION v6 fdaa:x:x:x:x::x private global
访问私有部署
由于没有公共 URL,使用以下方法之一:
选项 1:本地代理(最简单)
Forward local port 3000 to the app fly proxy 3000:3000 -a my-openclaw # Then open http://localhost:3000 in browser
选项 2:WireGuard VPN
Create WireGuard config (one-time) fly wireguard create # Import to WireGuard client, then access via internal IPv6 # Example: http://[fdaa:x:x:x:x::x]:3000
选项 3:仅 SSH
fly ssh console -a my-openclaw
私有部署的 Webhooks
如果你需要 webhook 回调(Twilio、Telnyx 等)而不暴露公共:
- ngrok 隧道在容器内或作为 sidecar 运行 ngrok
- Tailscale Funnel通过 Tailscale 暴露特定路径
- 仅出站某些提供商(Twilio)对于出站呼叫无需 webhooks 也能正常工作
使用 ngrok 的示例语音通话配置:
{ "plugins": { "entries": { "voice-call": { "enabled": true, "config": { "provider": "twilio", "tunnel": { "provider": "ngrok" } } } } } }ngrok 隧道在容器内运行并提供公共 webhook URL,而不暴露 Fly 应用本身。
安全优势
注意事项
- Fly.io 使用x86 架构(非 ARM)
- Dockerfile 兼容两种架构
- 对于 WhatsApp/Telegram 新手引导,使用
fly ssh console - 持久数据位于
/data卷上 - Signal 需要 Java + signal-cli;使用自定义镜像并保持内存在 2GB+。
成本
使用推荐配置(shared-cpu-2x,2GB RAM):
- 根据使用情况约 $10-15/月
- 免费套餐包含一些配额
详情参见Fly.io 定价。

免费下载


企业跨境出海综合服务平台


新手指南
热门推荐
平台常见问题
版权归出海网跨境电商(广州)有限公司所有 粤ICP备2021037671号-5